Apache Tomcat
If you are reading this post to configure Apache Tomcat to enable the Client / Server Authentication, then you must be already aware of what Apache Tomcat is, but still for the beginners:
Apache Tomcat, often known as Tomcat, as per the Apache Org. is an open source software implementation of the Java Servlets , JavaServer Pages, Java Expression Language and Java WebSocket Technologies. It is not a full fledged Application Server. This is a big misconception most of the people have in their mind that Tomcat is an Application Server. I would prefer to say that Tomcat is more than a Web Server and less than an App Server. To know more about the difference between Web Server and App Server you can visit the below link.
Continuing further, in the below section, a brief introduction of SSL / TLS is give, which you can skip if you already know what it is.
Introduction to SSL / TLS
Secure Socket Layer and it's successor Transport Layer Security are the technologies using which we can communicate over a secured connection. This means that the data being sent is encrypted by the sender and at the receiver's side is decrypted before processing. This ensures that no one other than the sender and receiver are able to understand the data.
Another important aspect of SSL / TLS is Authentication. This means that the server and the client can be ensured that the other party is indeed who and what it claims to be. This can be done by presenting a set of credentials called as "Certificate", Most of the times it is one sided, means the server sending the certificate proving it's identity. But, in certain cases the server may also ask client to prove that the client is who it claims to be. In that case, the client will also send a certificate proving it's identity. This is known as Client Authentication.
Another important aspect of SSL / TLS is Authentication. This means that the server and the client can be ensured that the other party is indeed who and what it claims to be. This can be done by presenting a set of credentials called as "Certificate", Most of the times it is one sided, means the server sending the certificate proving it's identity. But, in certain cases the server may also ask client to prove that the client is who it claims to be. In that case, the client will also send a certificate proving it's identity. This is known as Client Authentication.
SSL / TLS and Tomcat
It is important to keep in mind that configuring tomcat to take advantage of SSL / TLS is necessary only when you are using tomcat as a stand-alone web server. Means that you are using only tomcat to work with your application and not any other Web Server. If you are using tomcat primarily as a Servlet / JSP container behind any other web serve like Apache Web Server or IIS, it is necessary to configure the primary web server to handle the SSL connection from users.
You can give any suitable name for the key file. "1024" is the key size. You can give any key size according to your requirement. Once this command is executed successfully, you'll find the ".key" file in your directory.
If you are using the GnuWin32's openssl than you can find this openssl.cnf file in the "share" folder under the GnuWin32 folder. As soon as you hit the enter, you'll be asked to give some details like, Country Name, State, City, Common Name. Provide all information and press enter. You can ignore giving the challenge password and optional company name by simply pressing enter. Refer the screenshot for your reference.
Certificates
In order to use SSL / TLS, the server must have an associated certificate for each external interface (IP Address) that accepts the secure connections. Cutting the long story short; the certificate proves that the server is actually the valid server who it claims to be. But how do you know that the certificate itself is a valid certificate. A certificate can be trusted only, if it is signed by a good certificate authority (CA).
A certificate authority is a body, which issues certificates. Suppose you want to prove the identity of your server, so what you need to do is generate a certificate signing request (Will see how in further section) and submit it to the certificate authority. It will generate a certificate and a public-private key pair. The public key is mentioned in the certificate along with other details while the CA will give us the private key separately. Now you can provide this certificate to the client and send the data encrypted by your private key. The client will use the public key mentioned in the certificate to decrypt the data. This is how authentication is done using the certificates. Some of the famous certificate authorities are: Verisign, GeoTrust, Comodo, Digicert, Thwate, GoDaddy, Network Solutions
Client Authentication in Tomcat
In this section, we will see how to configure Tomcat so that it can take advantage of Client Authentication. Here, Tomcat is our server and browser is the client. Enabling client authentication, means browser will send one certificate to tomcat proving it's identity.
We'll require three certificates. 1) Server Certificate, using which tomcat will prove it's identity, 2) Client Certificate, using which browser will prove it's identity and 3) Certificate Authority's certificate which will be used to sign the Server and the Client Certificate. Here we will see the example of Self Signed Certificate Authority, i.e. we will only generate the all the certificates and we will sign the Server and the Client Certificate using the Certificate Authority's Certificate.
Tomcat stores the Server certificate in keystore and the Certificate Authority's certificate in truststore. We'll see further, how to generate them.
With this the theory part ends, now we'll do some practicals. ;)
Prerequisites
Make sure before performing the steps given below you'll require following tools.
1) Java
2) Openssl.
I am assuming that you already have Java installed, so moving further, you can download OpenSSL for Windows from the below link.
After installing OpenSSL, open the windows command prompt and perform the following steps. Change the path of the command prompt to the directory where you would like to store the certificates.
Step 1: Generate Certificate Authority's Key and Certificate.
To generate the certificate for the certificate authority, we'll need a key and a Certificate Signing Request. (CSR)
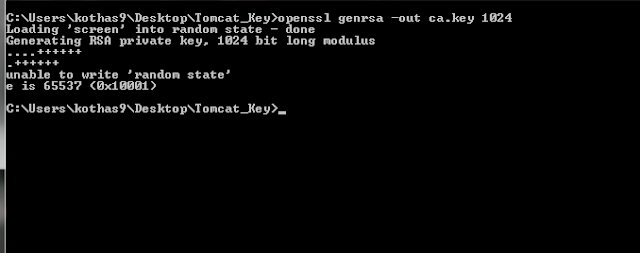
- Generating Key
To generate the key type following command.
openssl genrsa -out <key-file-name>.key 1024

You can give any suitable name for the key file. "1024" is the key size. You can give any key size according to your requirement. Once this command is executed successfully, you'll find the ".key" file in your directory.
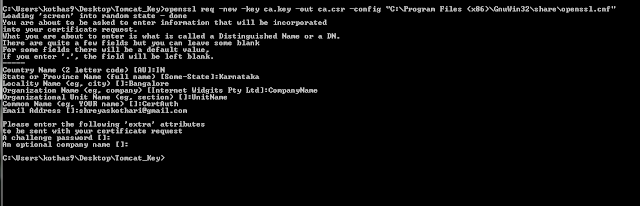
- Generate Certificate Signing Request.
openssl req -new -key <key-file-name>.key -out <csr-file-name>.csr -config path/to/openssl.cn

If you are using the GnuWin32's openssl than you can find this openssl.cnf file in the "share" folder under the GnuWin32 folder. As soon as you hit the enter, you'll be asked to give some details like, Country Name, State, City, Common Name. Provide all information and press enter. You can ignore giving the challenge password and optional company name by simply pressing enter. Refer the screenshot for your reference.
- Generate the Certificate Authority's Certificate
openssl x509 -req -days 365 -in <csr-file-name>.csr -signkey <key-file-name>.key -out <crt-file-name>/crt

Now, you have three files in your directory. i.e. the Certificate Authority's Key, CSR file and the certificate. You can delete the CSR file as it is no longer required.
Step - 2: Generate Server's Key and Certificate.
You can use the first two commands that are given above in the first step to generate the KEY file and the CSR file for the Server Certificate. Once they are generated, we'll generate the Server Certificate which will be signed by the Certificate Authority.
Type the following command once you have the Key file and CSR file for the server.
openssl x509 -req -days 365 -CA <CertificateAuthority'sCertificate>.crt -CAkey <CertificateAuthority'sKey>.key -CAcreateserial -in <ServerCSR-file-name>.csr -out <ServerCRT-file-name>.crt
Now you have two certificates i.e. a CA's certificate and a Server's certificate. If you don't want to enable the client authentication, i.e. you don't want your client to prove it's identity than you can directly skip the below Step - 3 and jump to Step - 5.
Step - 3: Generate Client's Key and Certificate.
Follow the same steps as Step - 2. Only change the name of server to client wherever required.
Step - 4: Converting the CRT file to P12 file.
Our browser supports the P12 file certificates, whenever it is required for it to prove it's identity by sending certificate to the server. So to convert the Server's and Client's CRT file to P12 file type the following command for server as well as client. Note that converting Certificate Authority's Certificate to P12 format is not required.
openssl pkcs12 -export -in <CRT-file-name>.crt -inkey <Key-file-name>.key -chain -CAfile <CertificateAuthority'sCertificate>.crt -out <P12-file-name>.p12

Here, it is important to understand what is P12 file. P12 is nothing but PKCS#12 file formate used for archiving many cryptography objects as a single file. It is commonly used to bundle a private key with it's X.509 certificate. For more information please refer the link. P12 Wikipedia
Step - 5: Generating the Keystore and TrustStore for tomcat.
As mentioned earlier, Tomcat stores it's Server Certificate in the Keystore and Certificate Authority's Certificate in Truststore. A keystore is nothing but a file which stores the certificate and the private key. It is not same as the P12 file. Remember, P12 file is for browser while the keystore is for the Tomcat. A Truststore only contains the Certificate of the Certificate Authority.
To generate and import the certificate to the truststore and keystore we'll use Java's Keytool utility.
- Importing Certificate Authority's Certificate to TrustStore
keytool -import -alias CertificateAuthority -keystore <TrustStoreName>.jks -file <CertificateAuthority'sCertificate>.crt

Once you execute this command, it will prompt you for the password. Note the password as we will mention it in the server.xml.
- Importing Server's Certificate to Keystore file.
Now, here there are two things. If you don't want the client authentication, than it is not required to store the key in the keystore file. So you can use the above command to import the server's certificate to the keystore file.
keytool -import -alias Server -keystore <KeyStoreName>.keystore -file <ServerCertificate>.crt
But, if you want to enable the client authentication, than importing key along with the certificate is necessary. Now with the above command, you can only import the certificate to the keystore file. So to have both, the key and the certificate in the keystore file, we need to import the P12 file which contain the key and the certificate. Following command will do that for you.
keytool -importkeystore -destkeystore <KeyStoreName>.keystore -srckeystore <P12-file-name>.p12 -srcstoretype PKCS12 -alias 1

It is recommended to give the alias name for the above commad as "1" for error free execution.
Step - 6: Changing the server.xml file in Tomcat
The SSL Connector will be commented, uncomment it and change it as follows.
- Enable Client Authentication:
If you want the client authentication than change the server.xml file as shown in the below screenshot.

- Disabel Client Authentication:
If you don't want the client authentication than change the server.xml file as shown in the below screenshot.

Step - 7: Settings in Browser
You need to perform this step only if you want to enable the client authentication. You need to import the Client Certificate that you generated to the browser. In this blog post I'll show you how to do that for Google Chrome and Mozilla Firefox.
- Google Chrome
In Google Chrome, go to Settings -> Manage Certificates.
In the Personal Tab: Click Import and choose your client certificate (P12 file), provide the password and click Ok.
- Mozilla Firefox
In Mozilla Firefox, go to Options -> Advanced -> Certificates -> View Certificates. In "Your Certificate" tab, click on Import, choose the client certificate (P12 file), provide password and click Ok.
Step - 8: Finally
At last, go to browser and try to access tomcat via the URL: https://localhost:8443. It will prompt to ask you whether the certificate is Okay. Click Ok.
I hope this helps. :) :)